03. 引入 Command
我们回顾一下目前的代码,如下;
using UnityEngine;
using UnityEngine.UI;

namespace QFramework.Example
{

    // 1. 定义一个 Model 对象
    public class CounterAppModel : AbstractModel
    {
        public int Count;

        protected override void OnInit()
        {
            Count = 0;
        }
    }


    // 2.定义一个架构(提供 MVC、分层、模块管理等)
    public class CounterApp : Architecture<CounterApp>
    {
        protected override void Init()
        {
            // 注册 Modelthis.RegisterModel(new CounterAppModel());
        }
    }

    // Controller
    public class CounterAppController : MonoBehaviour , IController
    /* 3.实现 IController 接口 */
    {
        // View
        private Button mBtnAdd;
        private Button mBtnSub;
        private Text mCountText;

        // 4. Model
        private CounterAppModel mModel;

        void Start()
        {
            // 5. 获取模型
            mModel = this.GetModel<CounterAppModel>();

            // View 组件获取
            mBtnAdd = transform.Find("BtnAdd").GetComponent<Button>();
            mBtnSub = transform.Find("BtnSub").GetComponent<Button>();
            mCountText = transform.Find("CountText").GetComponent<Text>();


            // 监听输入
            mBtnAdd.onClick.AddListener(() =>
            {
                // 6. 交互逻辑
                mModel.Count++;
                // 表现逻辑
                UpdateView();
            });

            mBtnSub.onClick.AddListener(() =>
            {
                // 7. 交互逻辑
                mModel.Count--;
                // 表现逻辑
                UpdateView();
            });

            UpdateView();
        }

        void UpdateView()
        {
            mCountText.text = mModel.Count.ToString();
        }

        // 3.public
        IArchitecture GetArchitecture()
        {
            return CounterApp.Interface;
        }

        private void OnDestroy()
        {
            // 8. 将 Model 设置为空
            mModel = null;
        }
    }
}
现在,数据共享的问题通过 引入 Model 解决了。
这里再次强调一下,需要共享的数据放 Model 里,不需要共享的,能不放就不放。
虽然引入了 Model,但是这套代码随着项目规模的发展还是有很多的问题。
其中最严重也最常见的就是 Controller 会越来越臃肿。
我们简单分析一下为什么 Controller 会越来越臃肿,我们先看下监听用户输入部分的代码,如下:
// 监听输入
mBtnAdd.onClick.AddListener(() =>
{
    // 交互逻辑
    mModel.Count++;
    // 表现逻辑
    UpdateView();
});

mBtnSub.onClick.AddListener(() =>
{
    // 交互逻辑
    mModel.Count--;
    // 表现逻辑
    UpdateView();
});
在处理用户输入的代码中,笔者写了注释,交互逻辑 和 表现逻辑。
什么是交互逻辑 和 表现逻辑?
非常简单。
交互逻辑,就是从用户输入开始到数据变更的逻辑
顺序是 View->Controller->Model
表现逻辑,就是数据变更到在界面显示的逻辑
顺序是 Model->Controller->View
如下图所示:
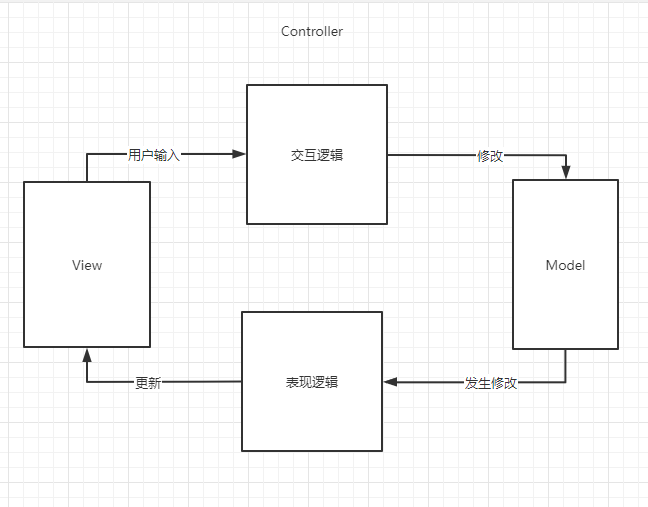
虽然交互逻辑和表现逻辑理解起来简单,但是它们非常重要,因为 QFramework 接下来的概念都是围绕这两个概念展开的。
View、Model 以及 Controller 的交互逻辑和表现逻辑形成了一个闭环。构成了完整的 MVC 闭环。
而 Controller 本身之所以臃肿,是因为,它负责了两种职责,即改变 Model 数据 的交互逻辑,以及 Model 数据变更之后更新到界面的表现逻辑。
而在一个有一定规模的项目中,表现逻辑和交互逻辑非常多。而一个 Controller 很容易就做到上千行代码。
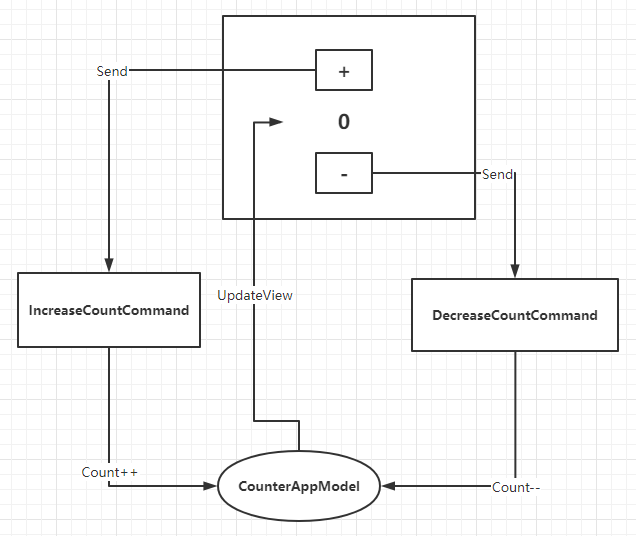
而大部分的 MVC 方案,解决 Controller 臃肿用的是引入 Command 的方式,即引入命令模式,通过命令来分担 Controller 的交互逻辑的职责。
QFramework 也是使用了同样的方式解决 Controller 臃肿的问题。
我们将代码改成如下:
using UnityEngine;
using UnityEngine.UI;

namespace QFramework.Example
{

    // 1. 定义一个 Model 对象
    public class CounterAppModel : AbstractModel
    {
        public int Count;

        protected override void OnInit()
        {
            Count = 0;
        }
    }


    // 2.定义一个架构(提供 MVC、分层、模块管理等)
    public class CounterApp : Architecture<CounterApp>
    {
        protected override void Init()
        {
            // 注册 Model
            this.RegisterModel(new CounterAppModel());
        }
    }

    // 引入 Command
    public class IncreaseCountCommand : AbstractCommand // ++
    {
        protected override void OnExecute()
        {
            this.GetModel<CounterAppModel>().Count++;
        }
    }

    public class DecreaseCountCommand : AbstractCommand // ++
    {
        protected override void OnExecute()
        {
            this.GetModel<CounterAppModel>().Count--;
        }
    }

    // Controller
    public class CounterAppController : MonoBehaviour , IController
    /* 3.实现 IController 接口 */
    {
        // View
        private Button mBtnAdd;
        private Button mBtnSub;
        private Text mCountText;

        // 4. Model
        private CounterAppModel mModel;

        void Start()
        {
            // 5. 获取模型
            mModel = this.GetModel<CounterAppModel>();

            // View 组件获取
            mBtnAdd = transform.Find("BtnAdd").GetComponent<Button>();
            mBtnSub = transform.Find("BtnSub").GetComponent<Button>();
            mCountText = transform.Find("CountText").GetComponent<Text>();


            // 监听输入
            mBtnAdd.onClick.AddListener(() =>
            {
                // 交互逻辑
                this.SendCommand<IncreaseCountCommand>();
                // 表现逻辑
                UpdateView();
            });

            mBtnSub.onClick.AddListener(() =>
            {
                // 交互逻辑
                this.SendCommand<DecreaseCountCommand>();
                // 表现逻辑
                UpdateView();
            });

            UpdateView();
        }

        void UpdateView()
        {
            mCountText.text = mModel.Count.ToString();
        }

        // 3.
        public IArchitecture GetArchitecture()
        {
            return CounterApp.Interface;
        }

        private void OnDestroy()
        {
            // 8. 将 Model 设置为空
            mModel = null;
        }
    }
}
代码很简单,我们用流程图表示如下:
运行 Unity,结果如下:
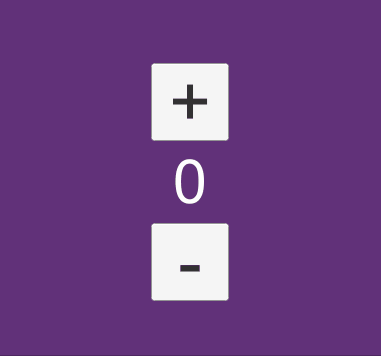
没有变化,运行正确。
大家可能会问,一个简单的数据加减操作,至于创建一个 Command 对象来承担么?看不出来好处呀,反而代码更多了。
如果整个项目只有一个简单的数据加减操作,那使用 Command 有点多此一举,但是一般的项目的交互逻辑,是非常复杂的,代码量也非常多,整个时候使用 Command 词汇发挥作用。
具体发挥什么作用,使用 Command 可以带来很多便利,比如:
Command 可以复用,Command 也可以调用 Command
Command 可以比较方便实现撤销功能,如果 App 或者 游戏需要的话
如果遵循一定规范,可以实现使用 Command 跑自动化测试。
Command 可以定制 Command 队列,也可以让 Command 按照特定的方式执行
一个 Command 也可以封装成一个 Http 或者 TCP 里的一次数据请求
Command 可以实现 Command 中间件模式
等等
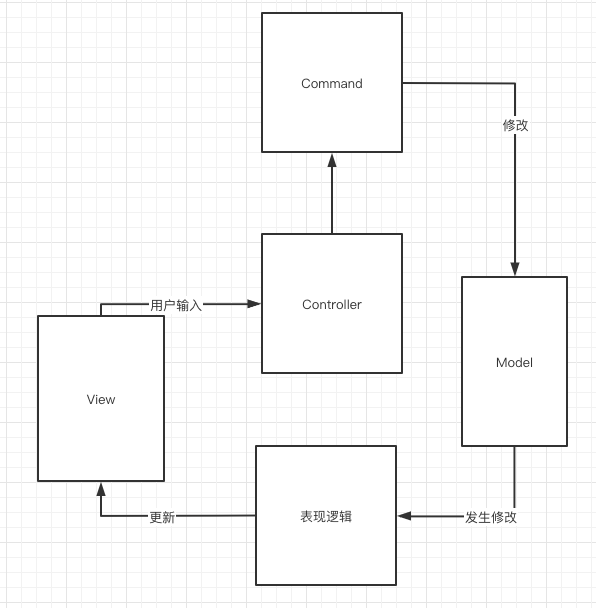
OK,通过引入 Command,帮助分担了 Controller 的交互逻辑。使得 Controller 成为一个薄薄的一层,在需要修改 Model 的时候,Controller 只要调用一句简单的 Command 即可。
Command 最明显的好处就是:
就算代码再乱,也只是在一个 Command 对象里乱,而不会影响其他的对象。
讲方法封装成命令对象,可以实现对命令对象的组织、排序、延时等操作。
更多好处会随着大家的实践慢慢体会到。
当前的 MVC 流程如下:
这篇内容就这些。