05. ResKit Resource Management & Development Solution
Introduction to Res Kit
Res Kit is a resource management and rapid development solution.
Features include:
You can use one API to load resources from dataPath, Resources, StreammingAssetPath, PersistentDataPath, and the network.
Simplify resource loading and unloading based on reference counting.
Embrace different stages in the game development process
In the development stage, you can load from dataPath without having to build AssetBundles.
In the testing stage, you only need to build AssetBundles once.
You can choose to generate resource name constant code to reduce spelling errors.
Asynchronous loading queue support
For AssetBundle resources, you can load resources only by resource name instead of AssetBundle name + resource name, simplifying API usage.
Quick Start with Res Kit
We know that in general, there are two ways to dynamically load resources:
Resources
AssetBundle
In Res Kit, it is recommended to use AssetBundle for loading because the AssetBundle encapsulated by Res Kit is easier to use than the Resources method.
In addition to being easier to use than the AsseBundle method in Res Kit, AssetBundle itself has more advantages than Resources, such as smaller package size and support for hot updates.
Without further ado, let’s take a look at the basic usage of Res Kit.
In the development stage, Res Kit is divided into two steps.
Mark resources
Write code
Before we start, we need to make sure that the current Res Kit environment is in simulation mode.
Press the shortcut key ctrl + e or ctrl + shift + r, and we can see the following panel:
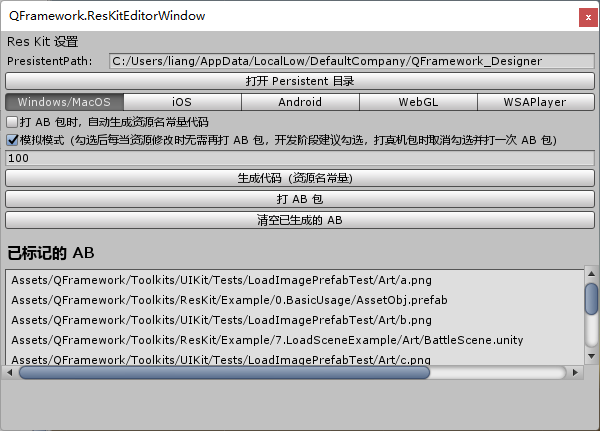
After making sure that the simulation mode is selected, we can enter the usage process.
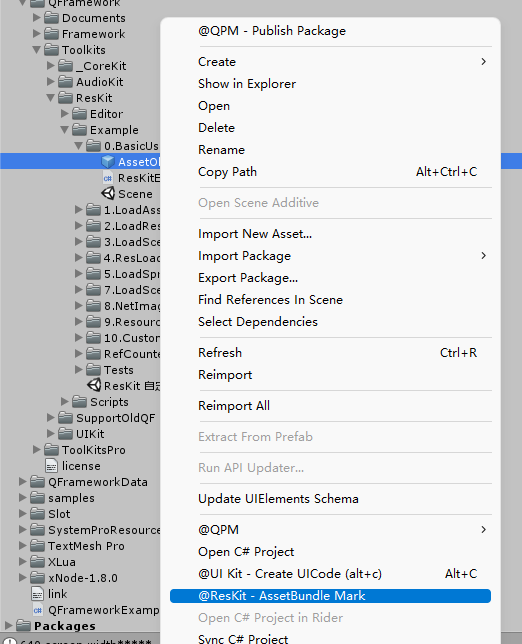
1. Resource Marking
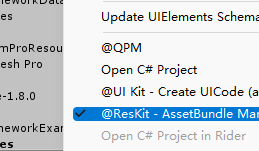
In the Asset directory, simply right-click on the file or folder that needs to be marked and select @ResKit-AssetBundle Mark, as shown below:
After marking,
After successful marking, we can see the following results:
The option marked for the resource is selected
The name of the AssetLabel for the resource is as follows
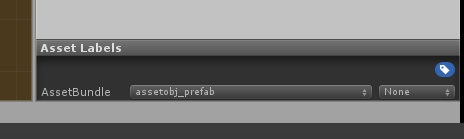
This is a successful marking.
Note that one marking is one AssetBundle. If you want the AssetBundle to contain multiple resources, you can put multiple resources in a folder and then mark the folder.
2. Resource Loading
Next, we can directly write the code for resource loading. The code is as follows. See the comments for the specific code meaning.
using UnityEngine;

namespace QFramework.Example
{
    public class ResKitExample : MonoBehaviour
    {
        // 每个脚本都需要
        private ResLoader mResLoader = ResLoader.Allocate();

        private void Start()
        {
            // 项目启动只调用一次即可
            ResKit.Init();

            // 通过资源名 + 类型搜索并加载资源(更方便)
            var prefab = mResLoader.LoadSync<GameObject>("AssetObj");
            var gameObj = Instantiate(prefab);
            gameObj.name = "这是使用通过 AssetName 加载的对象";

            // 通过 AssetBundleName 和 资源名搜索并加载资源(更精确)
            prefab = mResLoader.LoadSync<GameObject>("assetobj_prefab", "AssetObj");
            gameObj = Instantiate(prefab);
            gameObj.name = "这是使用通过 AssetName  和 AssetBundle 加载的对象";
        }

        private void OnDestroy()
        {
            // 释放所有本脚本加载过的资源
            // 释放只是释放资源的引用
            // 当资源的引用数量为 0 时,会进行真正的资源卸载操作
            mResLoader.Recycle2Cache();
            mResLoader = null;
        }
    }
}
Attach this script to any GameObject, and after running it, the result is as follows:
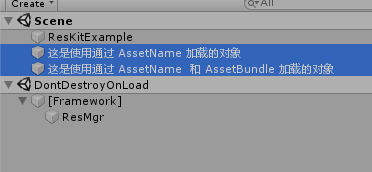
The resource is loaded successfully.
Simulation Mode and Non-Simulation Mode
Inconvenience of AssetBundle
Before using Res Kit, I believe that most people have more or less come into contact with AssetBundle. Some may have used AssetBundle in projects, and some may have only learned AssetBundle briefly. In short, before using Res Kit, AssetBundle can be summarized in two words: troublesome.
What’s the trouble with AssetBundle?
Firstly, AssetBundle needs to be packaged before loading resources at runtime. Packaging requires us to write editor extension scripts, which also need to handle platform and path-related logic in the editor extension scripts.
At runtime, it is necessary to load the corresponding AssetBundle based on the platform and path.
These operations are quite troublesome to think about.
Since AssetBundle is so troublesome, why do we still use AssetBundle?
Because AssetBundle can bring better performance to the project, and AssetBundle supports hot updates.
With these two advantages, AssetBundle has become the inevitable choice for many projects.
In Res Kit, in order to solve the problem of frequent packaging, a concept called Simulation Mode is introduced.
Simulation Mode
What is Simulation Mode?
As the name suggests, it is a mode that simulates loading AssetBundle. Here, it is only simulated and AssetBundle is not actually loaded. Instead, resources under the Application.dataPath directory are loaded, that is, resources under the Assets directory.
What are the benefits of doing this?
The benefit is that whenever a resource is modified, there is no need to package the AB again, and the modified resource can be loaded at runtime.
If it is in non-simulation mode, every time a resource is modified, an AB package needs to be packaged again to load the modified resource.
Therefore, a simulation mode solves the problem of frequent AB packaging, thereby improving our development efficiency in the development stage.
So when using Res Kit, what stage does the simulation mode correspond to, and what stage does the non-simulation mode correspond to?
The answer is the real machine stage.
Development Stage, Real Machine Stage
The development stage and the real machine stage are not concepts provided by Unity, but two concepts proposed by the author in iterating Res Kit.
These two concepts are easy to understand:
Development stage: the stage of developing logic, requiring a lot of logic to be written, and in most cases, developed in the Unity Editor environment.
Real machine stage: the stage that needs to be run on the real machine. This stage is mainly for a lot of testing or real release.
I believe that projects of a certain scale will be divided into stages, such as development stage, testing stage, production stage, etc., which should be easy for everyone to understand.
Next, let’s briefly analyze the characteristics of the development stage and the real machine stage.
Development Stage In the development stage, developers need to write a lot of logic, and the resource directory is not stable yet, and there will be a lot of changes during the development process. If every modification of resources requires AB packaging, it will greatly affect the development progress.
Real Machine Stage In the real machine stage, generally, the logic of a version is completed, and only some testing and debugging work needs to be done. At this stage, the resource directory is stable and does not require much adjustment.
In the real machine stage, only one AB needs to be built before each App package is built.
Of course, in the Unity Editor environment, you can uncheck the simulation mode, so that the real AssetBundle package can be loaded in the Unity Editor environment.
As mentioned in the previous article, embracing each development stage means considering the development stage and the real machine stage.
That’s all for this article.
Summary
Development stage:
Simulation mode
Real machine stage:
Build an AB package before each App package is built.
In the Unity Editor environment, uncheck the simulation mode, and the resources loaded at runtime are the real AssetBundle resources.
How to Build AssetBundle (Real Mode)
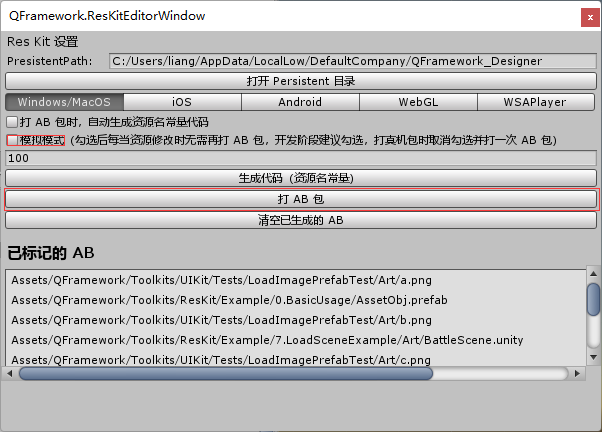
Click “Build AB Package” when the simulation mode is unchecked.
Asynchronous Loading
The asynchronous loading code is as follows:
// 添加到加载队列
mResLoader.Add2Load("TestObj",(succeed,res)=>{
    if (succeed)
    {
        res.Asset.As<GameObject>()
                        .Instantiate();
    }
});

// 执行异步加载
mResLoader.LoadAsync();
Unlike LoadSync, asynchronous loading is divided into two steps, the first step is to add to the loading queue, and the second step is to perform asynchronous loading.
This is to support loading multiple resources asynchronously at the same time.
Asynchronous Loading
The code is as follows:
using System.Collections;
using UnityEngine;

namespace QFramework.Example
{
    public class AsyncLoadExample : MonoBehaviour
    {
        IEnumerator Start()
        {
            yield return ResKit.InitAsync();

            var resLoader = ResLoader.Allocate();

            resLoader.Add2Load<GameObject>("AssetObj 1",(b, res) =>
            {
                if (b)
                {
                    res.Asset.As<GameObject>().Instantiate();
                }
            });

            // AssetBundleName + AssetName
            resLoader.Add2Load<GameObject>("assetobj 2_prefab","AssetObj 2",(b, res) =>
            {
                if (b)
                {
                    res.Asset.As<GameObject>().Instantiate();
                }
            });

            resLoader.Add2Load<GameObject>("AssetObj 3",(b, res) =>
            {
                if (b)
                {
                    res.Asset.As<GameObject>().Instantiate();
                }
            });

            resLoader.LoadAsync(() =>
            {
                // 加载成功 5 秒后回收
                ActionKit.Delay(5.0f, () =>
                {
                    resLoader.Recycle2Cache();

                }).Start(this);
            });
        }

    }
}
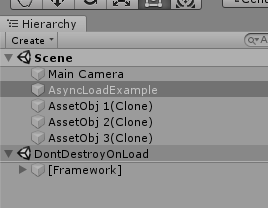
The result is as follows:
Loading Scene
Note: When marking the scene, make sure that one scene is one AssetBundle.
using UnityEngine;

namespace QFramework.Example
{
    public class LoadSceneExample : MonoBehaviour
    {
        private ResLoader mResLoader = null;

        void Start()
        {
            ResKit.Init();

            mResLoader = ResLoader.Allocate();

            // 同步加载
            mResLoader.LoadSceneSync("SceneRes");

            // 异步加载
            mResLoader.LoadSceneAsync("SceneRes");

            // 异步加载
            mResLoader.LoadSceneAsync("SceneRes", onStartLoading: operation =>
            {
                // 做一些加载操作
            });
        }

        private void OnDestroy()
        {
            mResLoader.Recycle2Cache();
            mResLoader = null;
        }
    }
}
Loading resources from Resources
using UnityEngine;
using UnityEngine.UI;

namespace QFramework.Example
{
    public class LoadResourcesResExample : MonoBehaviour
    {
        public RawImage RawImage;

        private ResLoader mResLoader = ResLoader.Allocate();

        private void Start()
        {
            //  加载 Resources 目录里的资源不用调用 ResKit.Init

            RawImage.texture = mResLoader.LoadSync<Texture2D>("resources://TestTexture");
        }

        private void OnDestroy()
        {
            Debug.Log("On Destroy ");
            mResLoader.Recycle2Cache();
            mResLoader = null;
        }
    }
}
Associated Object Management
using System.Collections;
using UnityEngine;
using UnityEngine.UI;

namespace QFramework.Example
{
    public class ResLoaderRelateUnloadAssetExample : MonoBehaviour
    {
        // Use this for initialization
        IEnumerator Start()
        {
            var image = transform.Find("Image").GetComponent<Image>();

            ResKit.Init();

            var resLoader = ResLoader.Allocate();

            var texture2D = resLoader.LoadSync<Texture2D>("TextureExample1");

            // create Sprite 扩展
       var sprite = Sprite.Create(texture2D, new Rect(0, 0, texture2D.width, texture2D.height), Vector2.one * 0.5f);

            image.sprite = sprite;

            // 添加关联的 Sprite
            resLoader.AddObjectForDestroyWhenRecycle2Cache(sprite);

            yield return new WaitForSeconds(5.0f);

            // 当释放时 sprite 也会销毁
            resLoader.Recycle2Cache();
            resLoader = null;
        }
    }
}
Loading SpriteAtlas
using System.Collections;
using UnityEngine;
using UnityEngine.U2D;
using UnityEngine.UI;

namespace QFramework
{
    /// <inheritdoc />
    /// <summary>
    /// 参考:http://www.cnblogs.com/TheChenLin/p/9763710.html
    /// </summary>
    public class TestSpriteAtlas : MonoBehaviour
    {
        [SerializeField] private Image mImage;

        // Use this for initializationprivate IEnumerator Start()
        {
            var loader = ResLoader.Allocate();

            ResKit.Init();

            var spriteAtlas = loader.LoadSync<SpriteAtlas>("spriteatlas");
            var square = spriteAtlas.GetSprite("shop");

            loader.AddObjectForDestroyWhenRecycle2Cache(square);

            mImage.sprite = square;

            yield return new WaitForSeconds(5.0f);

            loader.Recycle2Cache();
            loader = null;
        }
    }
}
Loading network images
using UnityEngine;
using UnityEngine.UI;

namespace QFramework.Example
{
    public class NetImageExample : MonoBehaviour
    {
        ResLoader mResLoader = ResLoader.Allocate();

        // Use this for initializationvoid Start()
        {
            var image = transform.Find("Image").GetComponent<Image>();

            mResLoader.Add2Load<Texture2D>(
                "http://pic.616pic.com/ys_b_img/00/44/76/IUJ3YQSjx1.jpg".ToNetImageResName(),
                (b, res) =>
                {
                    if (b)
                    {
                        var texture = res.Asset as Texture2D;

                        var sprite = Sprite.Create(texture, new Rect(0, 0, texture.width, texture.height),
                            Vector2.one * 0.5f);
                        image.sprite = sprite;
                        mResLoader.AddObjectForDestroyWhenRecycle2Cache(sprite);
                    }
                });

            mResLoader.LoadAsync();
        }

        private void OnDestroy()
        {
            mResLoader.Recycle2Cache();
            mResLoader = null;
        }
    }
}
Loading images from PersistentDataPath
namespace QFramework.Example
{
    using System.Collections;
    using UnityEngine.UI;
    using UnityEngine;

    public class ImageLoaderExample : MonoBehaviour
    {
        private ResLoader mResLoader = null;

        private IEnumerator Start()
        {
            ResMgr.Init();

            mResLoader = ResLoader.Allocate();

            // local imagevar localImageUrl = "file://" + Application.persistentDataPath + "/Workspaces/lM1wmsLQtfzRQc6fsdEU.jpg";

            mResLoader.Add2Load(localImageUrl.ToLocalImageResName(),
                delegate(bool b, IRes res)
                {
                    Debug.LogError(b);
                    if (b)
                    {
                        var texture2D = res.Asset as Texture2D;
                        transform.Find("Image").GetComponent<Image>().sprite = Sprite.Create(texture2D,
                            new Rect(0, 0, texture2D.width, texture2D.height), Vector2.one * 0.5f);
                    }
                });

            mResLoader.LoadAsync();


            yield return new WaitForSeconds(5.0f);
            mResLoader.Recycle2Cache();
            mResLoader = null;
        }
    }
}
Custom Res
ResKit provides Custom Res, which can be used to easily customize the loading source of Res, such as PersistentDataPath, StreamingAssetPath, AssetBundle, and even assets such as GameObject in memory. It can also integrate Addressables or other resource management solutions. The built-in AssetBundle, Resources, network image loading, and PersistentDataPath image loading in ResKit are all extended through Custom Res.
Let’s take a look at how to use Custom Res, as follows:
using UnityEngine;

namespace QFramework
{
    public class CustomResExample : MonoBehaviour
    {
        // 自定义的 Respublic class MyRes : Res
        {
            public MyRes(string name)
            {
                mAssetName = name;
            }

            // 同步加载(自己实现)public override bool LoadSync()
            {
                // Asset = 加载的结果给 Asset 赋值
                State = ResState.Ready;
                return true;
            }

            // 异步加载(自己实现)public override void LoadAsync()
            {
                // Asset = 加载的结果给 Asset 赋值
                State = ResState.Ready;
            }


            // 释放资源(自己实现)protected override void OnReleaseRes()
            {
                // 卸载操作// Asset = null
                State = ResState.Waiting;
            }
        }

        // 自定义的 Res 创建器(包含识别功能)public class MyResCreator : IResCreator
        {
            // 识别public bool Match(ResSearchKeys resSearchKeys)
            {
                return resSearchKeys.AssetName.StartsWith("myres://");
            }

            // 创建public IRes Create(ResSearchKeys resSearchKeys)
            {
                return new MyRes(resSearchKeys.AssetName);
            }
        }

        void Start()
        {
            // 添加创建器
            ResFactory.AddResCreator<MyResCreator>();

            var resLoader = ResLoader.Allocate();

            var resSearchKeys = ResSearchKeys.Allocate("myres://hello_world");

            var myRes =  resLoader.LoadResSync(resSearchKeys);

            resSearchKeys.Recycle2Cache();

            Debug.Log(myRes.AssetName);
            Debug.Log(myRes.State);
        }
    }
}
Very simple.
Code Generation
Res Kit supports code generation, and the location of the generate button is shown below:

Click the generate code button to generate the following result.
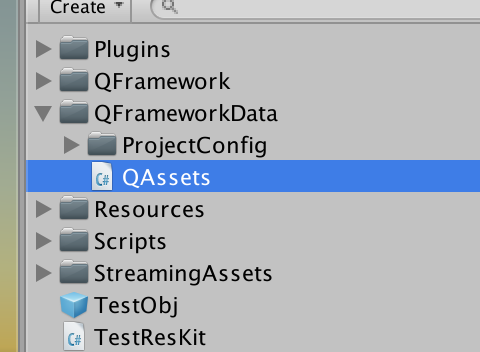
The QAssets code file is generated, and the code content is as follows:
namespace QAssetBundle
{

    public class Testobj_prefab
    {
        public const string BundleName = "testobj_prefab";
        public const string TESTOBJ = "testobj";
    }
    public class Testsprite_png
    {
        public const string BundleName = "testsprite_png";
        public const string TESTSPRITE = "testsprite";
    }
}
After generating the code, it will be very convenient to write resource loading code, as shown in the following figure:
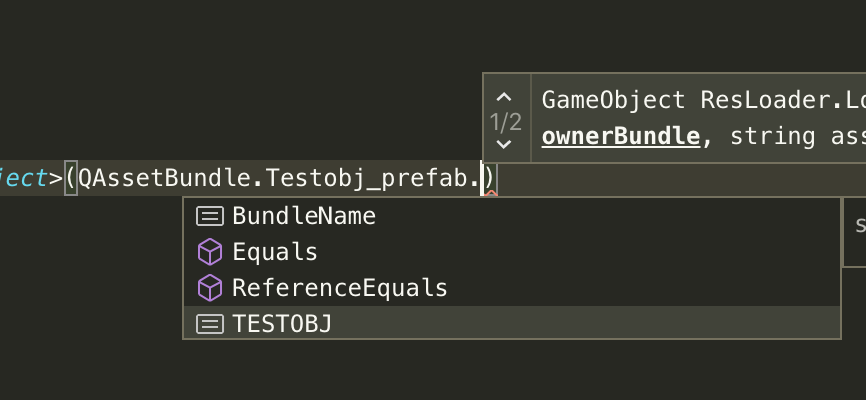
In the figure, the resource name is given as a prompt.
This way, it is not easy to make spelling errors in strings.
Recommended usage of ResLoader
The recommended usage of ResLoader is to apply a ResLoader for each unit that needs to be loaded.
The code is as follows:
using QF.Res;
using QF.Extensions;
using UnityEngine;

namespace QF.Example
{
    public class TestResKit : MonoBehaviour
    {
        /// <summary>/// 每一个需要加载资源的单元(脚本、界面)申请一个 ResLoader/// ResLoader 本身会记录该脚本加载过的资源/// </summary>/// <returns></returns>
        ResLoader mResLoader = ResLoader.Allocate ();

    ...

        void Destroy()
        {
            // 释放所有本脚本加载过的资源// 释放只是释放资源的引用// 当资源的引用数量为 0 时,会进行真正的资源卸载操作
            mResLoader.Recycle2Cache();
            mResLoader = null;
        }
    }
}
In the above code, TestResKit is a unit that needs to load resources.
What does this unit mean?
In fact, it is very simple. The unit can be a UIPanel (interface), or any MonoBehaviour that needs to load resource services.
Responsibilities of ResLoader
As its name suggests, the responsibility of ResLoader is to load resources, that is, the resource loader.
A ResLoader will record all the resources it has loaded.
So when it releases resources, it only needs to release them based on the loading record.
The schematic diagram of ResLoader and unit (Test script) is as follows:
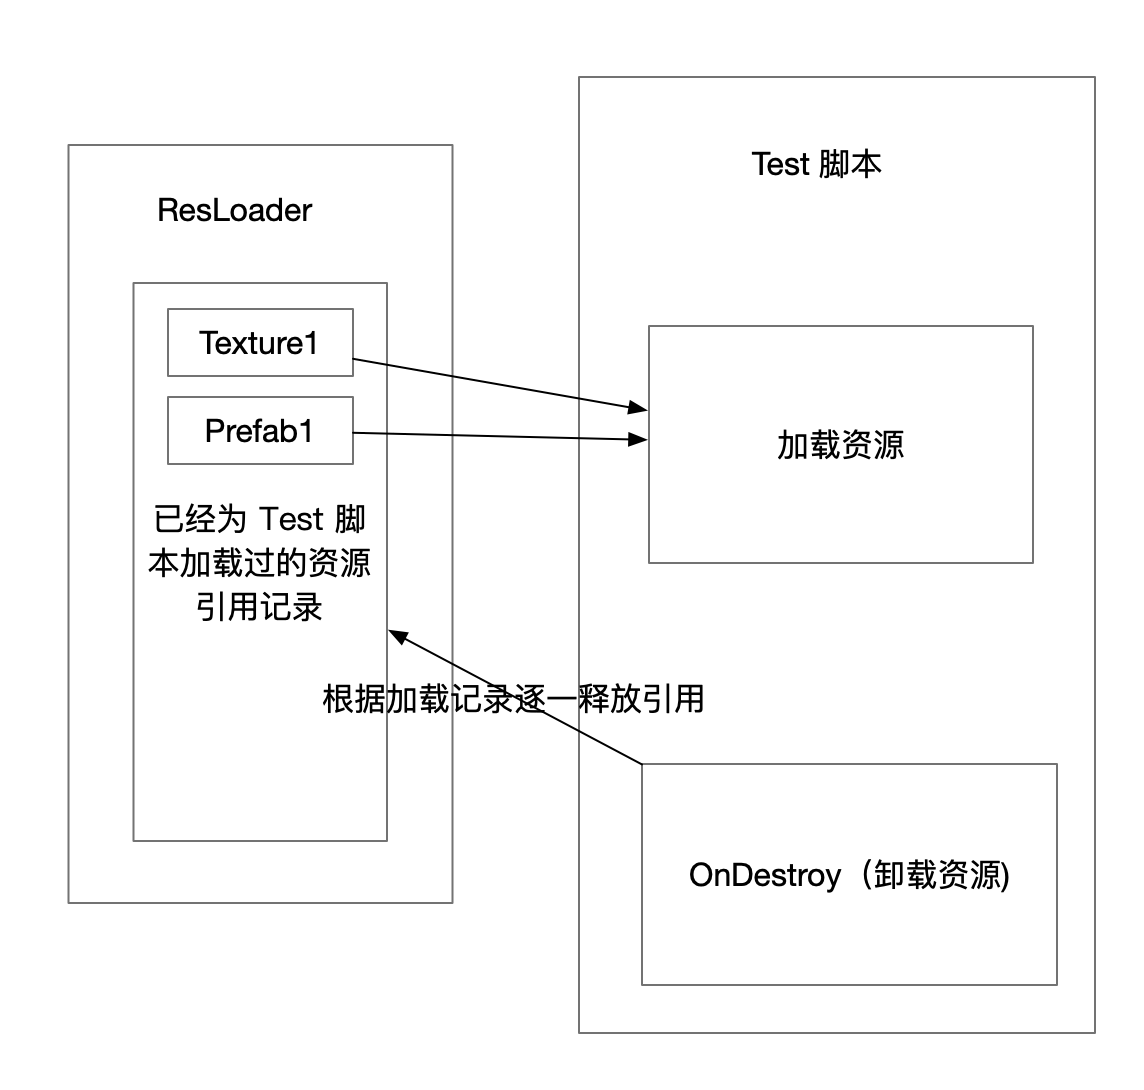
Here we need to pay attention that ResLoader is not performing the actual resource loading operation, but obtaining the resource reference.
The real resource loading is completed in ResMgr, and the user cannot perceive this process.
The process of ResLoader obtaining resource references is as follows:
Query whether the reference has been obtained from the reference record of ResLoader. If the resource reference has been recorded in ResLoader before, return the resource. Otherwise, go to step 2.
Query whether there is a resource object in ResMgr. If there is a resource object, return the resource, record the reference in ResLoader, and perform a reference count +1 operation on the resource object. Otherwise, go to step 3.
Let ResMgr load the resource and create the resource object, and the remaining steps are the same as step 2.
The process of accessing resources is roughly like this. It’s not important for usage if you don’t understand it.
All we need to know is that it is recommended to apply a ResLoader for each script that needs to be loaded in order to facilitate resource management.
Regardless of how many things this script has loaded, or how many other scripts have loaded, each script only needs to release its own ResLoader.
This is because each resource object has an integrated reference count.
Cost of Applying ResLoader
There is almost no cost because ResLoader is applied from the object pool.
WebGL Notes
On the WebGL platform, ResKit only supports asynchronous loading of AssetBundle resources.
Asynchronous Initialization
StartCoroutine(ResKit.InitAsync());
// 或者
ResKit.InitAsync().ToAction().StartGlobal();
Asynchronous Loading of Resources
Add2Load first
Then call LoadAsync()
Okay, that’s all for the introduction of ResKit.